Disk Druid
Up to version 6.1 (6.5), M used the 'Disk Druid'
partitioning tool which has since then been superseded by
'DiskDrake'.
Using the 'Disk Druid' involves no wizardry though, 'Disk Druid' just acts
as an graphical interface to the command line tool fdisk.
You should have made up your partitioning scheme
by now, if not, read the chapter on GNU/Linux
Partitionsfirst.
You can play around with partitions in 'Disk Druid' without causing any damage
to your disk. Changes will only be applied after your explicit permission.
By the way, the shots are PNG.
 section index section index  top top
-
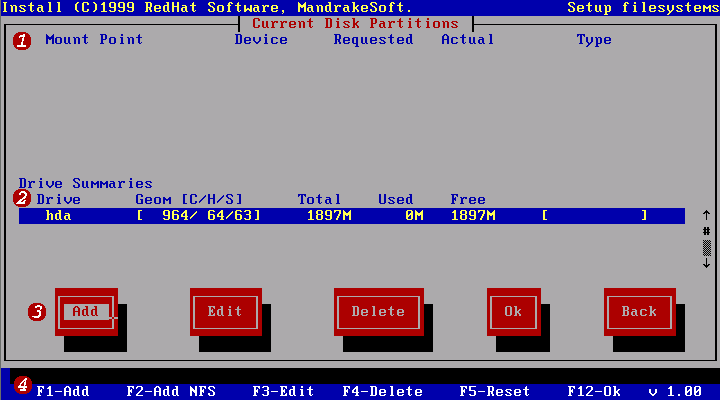
These are the categories that will list your
new partition data. If you already have partitions on the disk, they will
show up here as well.
-
Lists your hard-drives. Changes are only made
to the highlighted drive. Here you see one drive connected to the first IDE
channel and configured as 'master'. A 'slave' IDE drive on the same channel
would be 'hdb', a master on the second 'hdc' etc. SCSI drives are denoted
as 'sda', 'sdb', 'sdc' etc. If you need help with GNU/Linux' partition naming
scheme, read the appropriate paragraph
on the 'Mounting' page.
As you can see the drive is some 1.8GB large and all of the space is free.
The numbers and the status bar on the right will change dynamically to reflect
your current setup.
-
The control buttons. You can switch between
them using the TAB key. The ENTER key brings up the appropriate dialog.
-
Lists the keyboard shortcuts for the controls.
'Add NFS' means 'Add Network File System'. If you have no idea what that
is you certainly won't need it. 'Reset' will go back to the initial screen.
section index top
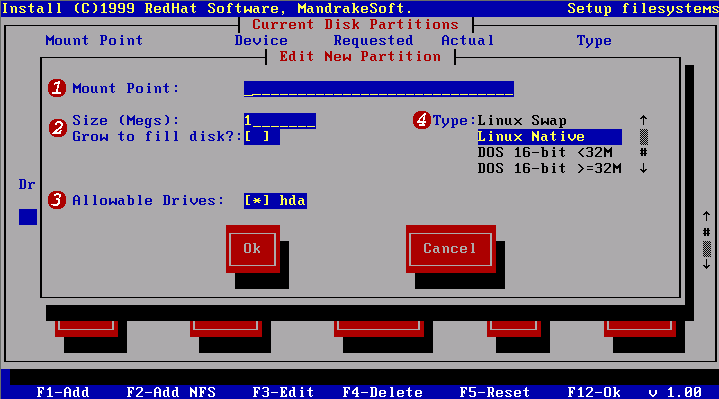
-
This will tell GNU/Linux where to mount the
new partition. Basically you only need one partition and that is '/', the
root partition. I have my own partitioning scheme (like everyone else with
some proficiency in GNU/Linux ;-)). You might want to read the introduction into the GNU/Linux file system,
if you want to know more.
You can also define mount points for other file systems (like MS-DOS FAT
or Windows 9x VFAT) via the 'Edit' dialog (like MS-DOS FAT or Windows 9x VFAT).
-
Here you may either the size for your new
partition or allow it to take up all the free space on the disk ('Grow to
fill disk'). This comes in handy when creating the last partition: just let
it grow to use all the remaining disk space.
-
Says to which drive(s) changes are to be made.
-
Type of file system to be created. Since you
are installing GNU/Linux you only have to care about the first two entries.
'Linux Native' is the correct type for all GNU/Linux partitions. 'Linux swap'
is a special type of file system for virtual memory (i.e. writing memory
data temporarily to disk). It is advised to have at least one 'swap' partition.
Due to the special nature of this file system its partition won't have a
mount point.
section index top
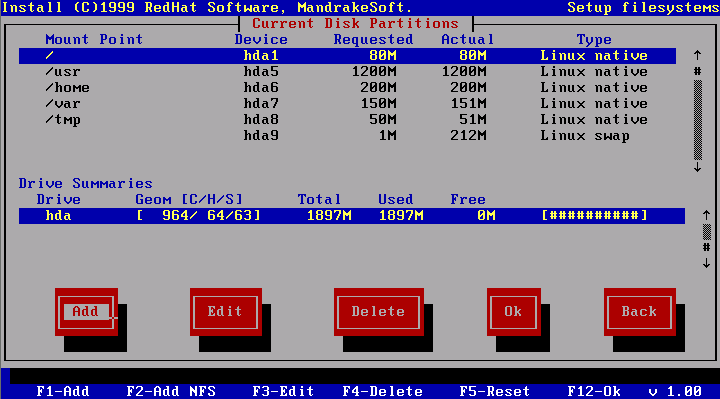
Now I've created my partition table. If you look
at the status line of 'hda', you'll see that all free space is allocated
to the partitions. Time to press 'OK' or hit the F12 key, and continue with
the installation.
section index top
|
